
Over a 35-plus-year career of building, renovating, and inspecting houses, I have developed a process to identify moisture sources, assess damage, and develop solutions. It’s largely informed by my location in climate zone 2. While I started out in California, I came to New Orleans (NOLA) in 2008 to observe the destruction of Hurricane Katrina and stayed on to help the rebuilding effort, which continues some 15 years later. In this hot, humid climate zone, any building project must address overwhelming moisture loads—ones much greater than in most parts of the country. Average annual rainfall here is about 60 inches. The relative humidity is often over 80%, the alluvial soil is full of moisture, and let’s not forget hurricanes, which are an ongoing threat.

2021 IECC - International Energy Conservation Code
Almost all my work, whether I am consulting or doing renovation work, starts with a site visit. I concentrate on the building envelope, the part of the building—floors, walls, ceilings, and roofs—that separates the interior conditioned space from the exterior unconditioned space. The visit results in both data and observations that form the basis of my report. Most of the time, I am working for building owners to ferret out a problem and devise a way to fix it. Every building and every problem is different, and there is no easy recipe to follow. Instead, I lean on an assortment of lifelong work practices, which underpin the process I follow on a building inspection:

No kickout. This roof-wall intersection should have a kickout flashing to direct runoff into the gutter.

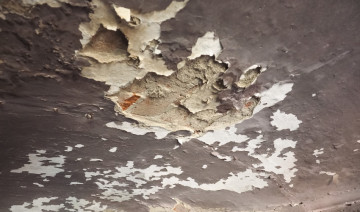
This is what the wall looked like when the gutter and the siding near the roof were removed.
A solid understanding of how buildings are put together is fundamental and provides a good starting place for sleuthing out where moisture leaks originate.
Moisture typically enters a building envelope through transitions and penetrations. Transitions are places like roof-wall intersections, inside and outside corners, and changes in materials, such as a transition from manufactured stone to any type of horizontal siding or stucco. Penetrations include doors, windows, and mechanical service entry points. Think Larry the Cable Guy or anyone drilling a hole through the envelope. But also think about the tiny penetrations, such as cracks and gaps between materials and the minute openings in porous materials, such as stucco or brick. There are obviously other ways moisture can get into a building; however, I like to start out simple.

No cut back or step flashing. Siding running down to the roof shingles is wicking water and is at risk of failing. Worse, this roof also lacks step flashing. The combined errors are causing water leaks inside the dormer.
A strong foundation in building science goes a long way toward helping practitioners solve for moisture. This can get pretty involved, but here I’ll zero-in on a few simple concepts to start with: the importance of drying, the forms moisture takes, what constitutes a leak, and the movement of water.
The first—importance of drying—overturns what used to be an accepted building performance rule: “Buildings need to breathe.” We (hopefully) no longer think this way. Now we need to think “buildings need to dry.” That is, building materials can get wet, even soaked, as long as they can dry. Wood, for example, won’t rot as long as it is dry more than it is wet. In my climate zone, wood that remains wet will rot fairly quickly because the temperatures are frequently around 70°F to 90°F—the temperature range that decay fungus thrives in. In other parts of the country, wood rot remains inactive for long periods of cold weather. Frequent wetting and drying might delay rot and mold growth, but it can still be destructive, as the swelling and shrinking with changes in moisture content can open up joints over time and invite more water in where it can seep down into cavities that take longer to dry.
We now use a lot of materials that are impervious to water, which might on the face of it seem like a good thing. But this also means many building materials can trap moisture that gets behind them.
Water comes in three recognizable forms: liquid, vapor, and ice.
Liquid. We tend to over-focus on rain as the primary source of bulk water, ignoring groundwater and runoff, which can add significant volumes of water to a building.
Vapor. Water in vapor form is damaging when it condenses on a cool surface. Condensation “leaks” are a lot less obvious to many in the trades, and many an air leak goes unnoticed because a contractor is looking for a water leak.
Ice. There is no need to be overly concerned about ice where I am, but ice dams are a source for moisture intrusion in many parts of the country.
For there to be a leak, there must be:
Moisture and energy go from more to less: hot to cold, wet to dry, high pressure to low pressure. Keeping this in mind allows us to determine where the moisture load is highest.
In my climate zone, for example, the outdoor humidity is typically much higher than the air-conditioned interior’s, and so moisture tends to move from outdoors to indoors and condense on surfaces toward the interior (such as the back of a drywall or plaster finish). In heating climates, the opposite is true: The indoor relative humidity in winter is typically much higher than it is in the cold outdoors, so moisture will move from indoors and tend to condense on surfaces near the outside of the wall (such as the back of the exterior sheathing).
I am trying to stop saying that buildings that meet building codes are barely legal buildings, but old habits are hard to break. I have transitioned into some expert witness work and have learned that in many cases, if the code is followed, there is nothing much to litigate. (In many cases, following code includes following manufacturers’ written instructions.) I am finding that divergences from codes and standards are a tell-tale sign that there are other things done incorrectly that may lead to moisture intrusion. A simple example is whether the kraft vapor-control layer of fiberglass batt insulation should face to the interior or exterior. In my region, it is better to face to the exterior, where the humidity level is typically highest. In mixed and heating-dominated climates, the opposite applies.
To form a coherent understanding of moisture problems, you need more than snapshots of the present conditions and visible surfaces. Moisture problems evolve over time. Building owners, service personnel, inspectors, and pretty much anyone who interacts with a building are witnesses to problems, and their observations can be helpful in sleuthing out true causes.
In new homes, the construction documents will answer many questions concerning possible problems. And of course, asking the project lead questions about such things as flashing, caulk, and water-resistive barriers can be helpful. Previous experience, or problems with a particular item, can lead to more questions and solutions.
It is helpful to know how long a problem has existed in an occupied home and if there was a triggering event—an equipment change, a renovation or installation of new furniture that altered air pathways, a storm or flood—leading to the problem. To sniff these answers out, it’s often helpful to interview the occupants.
When I begin a site visit, I ask homeowners or (when possible) tenants:
These are the basic questions and from there I can get the picture of what we are looking for. It is all about asking the right questions. I find the more talking we do, the more likely I might get what I need. Homeowners are not thinking about the problems from an analytic framework; it’s usually emotional, and you have to talk around the problems and get them to tell their stories about their home. Not all of the detail will be relevant, but if you push the conversation in the right way, you can get them to divulge those details that do matter.
Once I do an initial walk-around, I use a thermal camera to identify leaks and a moisture meter to confirm the moisture levels.
In my walk-through, I concentrate on “the four D’s”:
Deflection: overhangs, drip edges, kickout flashing, crickets.
Drainage: gutters, grade, rainscreens, drainable WRBs.
Drying: In older balloon-framed homes, the walls were not insulated, and this allowed for adequate drying. In this market, rainscreens have not taken hold, so new construction pretty much does not dry. The industry is inching toward enhanced drainage in the form of textured WRBs, mats, and other materials to create a drainage space behind the exterior cladding and trim.
Durability: The use of durable materials might seem to be a no-brainer but not so much. The old homes here are often more than 75 years old and, evidenced by the fact they are still standing, were built to dry.
I am not a licensed home inspector, as I’m not doing real-estate inspections for banks. Rather, I am typically looking at existing issues identified by a homeowner. Of course, if I find any life safety issues, I will bring them to the occupant’s attention. A common example I see in older homes is a water heater, which here is typically in the attic, with a vent that is not safely connected.
When I first entered the moisture-evaluation world, I was overly confident that my knowledge of construction made me qualified to solve all problems. As I burrowed deeper into the consulting world, I came to realize that recordable data was necessary not only to convince clients of my abilities but also to communicate my conclusions to program and finance partners, town officials, and other contractors working on the property. And often by getting a broader picture of the conditions, I am able to work out solutions for problems that aren’t immediately obvious and have compound causes.
