
Wood rot is a far bigger problem nowadays than it was in years past. That’s primarily because today’s fast-growthlumber is much less forgiving of sloppy construction or deferred maintenance than the hardy, old-growth species our ancestors built their homes with. On the bright side, however, technology has improved as resources have declined. High-strength-epoxy wood-repair systems used in combination with borate-based wood preservatives make it possible to not only repair rot-dam- aged wood but practically guarantee that the rot won’t return. None of these products are heap, though, so it’s essential to know when, where, and how to use them most effectively.
Not every rotten piece of wood can — or should — be repaired. Readily available trim elements that are easily removable (such as brick mold and fascia boards) are simply not worth the time and materials to fix unless the damage is minimal. Strong candidates for epoxy repair include expensive components like porch and stair parts, hard-to-remove elements like window sills, and historic pieces like moldings or turnings that would require custom replication.
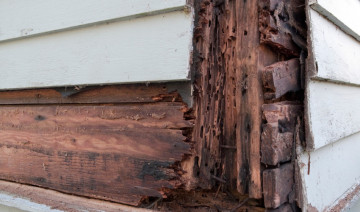
As with an iceberg, the vast majority of rot damage is beneath the surface. Before you can decide whether repair is feasible, you must determine the extent of the decay. I start with a painter’s 5-in-1 tool, carving into the loose, punky decay as if I were cleaning out a pumpkin. After I reach sound wood — it may be discolored but should be solidly attached — I use a scratch awl to poke around the inside of the crevice, like a dentist with a pick, searching for soft spots I may have overlooked. To verify that the surrounding wood is sound, I also drill a few exploratory 3/16-inch holes around the outside edges of the crevice.
When I’m satisfied that the damage is contained, I scrape away the paint along the edges of the repair area, then blow out the loose debris and dust with compressed air. Cleanliness is one key to a successful repair; dryness is another.
Fighting the fungus. Rot spores are present in most untreated wood. The wood provides a food source, but the organism needs moisture and warm temperatures in order to chow down and replicate. As long as the moisture content stays low (20 percent or less), the fungus will remain dormant. Since I cannot rest assured that my clients will diligently maintain their property after I’m gone, I apply a borate-based wood preservative that kills the rot fungus and prevents its return. I typically use a product called Board Defense, a powdered concentrate that’s mixed with water and applied with a sprayer. After thoroughly soaking down all of the affected surfaces, I allow them to dry completely before I begin making the repairs.
The liquid treatment gradually absorbs into the wood and kills hidden rot, but if I’m repairing a particularly large or heavily damaged structure (such as a column base), I’ll drill a few 1/4-inch holes into the center of the piece and inject a highly concentrated borate gel called Jecta. I purchase all of the borates I use — and some of the epoxies — from Wood Care Systems.
Assuming that the source of the moisture intrusion that set off the rot has been identified and corrected, drying time can vary from overnight to a week or more, depending on the extent of the damage. If rain is expected, I cover the object with a tent of 6-mil poly and secure it with duct tape. I now use a Delmhorst moisture meter (877/335-6467, delmhorst.com) to determine when the wood is acceptably dry, but for many years I relied on touch and feel — if in doubt, I would give it a few more days.
Supplies. Epoxies have a limited working time, so it’s crucial to assemble all the necessary tools and materials before you begin mixing. I keep a pair of tool kits well-stocked with latex gloves, plastic putty knives, disposable paint brushes, small plastic cups, stirring sticks, and a variety of other necessities in addition to the epoxy consolidants and fillers (Figure 2).
As to whose products to buy, I’ve used most — if not all — of the major brands, and I have no complaint about the quality of any manufacturer’s offerings. Some products are more user-friendly than others; some are more adjustable in terms of viscosity; and some are conveniently available over the counter at local supply houses (whereas others are obtainable only by mail-order). But all of the epoxies that are specifically marketed for wood restoration will get the job done as long as you follow the directions.
Consolidation. When the damaged piece is completely dry and I’m certain that the ambient temperature won’t dip below 50°F, I begin the repair by saturating the rot-affected wood with a low-viscosity liquid epoxy. After it soaks into the wood fibers, this consolidant will harden to provide reinforcement and pro- mote a strong bond between old wood and new epoxy filler (see sidebar, “How Much Rot Should You Remove?,” below).
Brushing the liquid epoxy on the surface adequately consolidates shallow damage. When I’m treating deeper wounds, however, I encircle the crevice with a series of 3/16-inch holes, taking care to stop the drill bit short of the bottom of the wood. I’ll use these holes as injection points to saturate the damaged area with consolidant.
After a final cleanup to remove the sawdust from the drilling operation, it’s time to mix the consolidant. Liquid epoxy clings tenaciously to any surface it lands on, so I lay out drop cloths when working around brick or stone, and I always wear latex gloves. On large jobs, I’ll slip on two pairs or more; if one gets messy I can simply peel it off and keep going. I mix up a batch of consolidant by pouring the specified amounts of resin and hardener into an 8-ounce hair-dye bottle — the kind with a nozzle top and 1-ounce graduations on the side — then stir the mixture thoroughly with a tongue depressor or a strip of cedar shim.
After pouring some of the liquid into a plastic cup for brushing, I screw the nozzle top onto the bottle and inject consolidant into each of the holes I drilled. As the liquid soaks into the wood, I alternate between brushing it on the exposed surfaces and refilling the holes. I don’t stop until the holes remain full and the surface of the damaged wood has glossed over. I usually allow the consolidant an hour or two to air dry, but if pressed for time, I’ll begin the filling work right away.
Gap filling. The mixing procedure for epoxy filler depends on the brand used. In some cases you add one or more powdered thickening agents to a two-part liquid epoxy. In others, you combine two lumps of putty and knead them together as if making bread. One manufacturer conveniently packages its resin and hardener separately in conjoined caulking tubes, so all you do is squeeze the trigger a few times and mix the two parts on a flat surface. After the paste is mixed, I spread the material out in a thin layer to dissipate the heat generated by the curing process and maximize its working time. For small repairs — those that require a baseball-sized mass of filler or less — I pack the void tightly and wipe the surface smooth using a disposable putty knife. If the filler “pulls” during this process, I lubricate the edge of the knife with a bit of leftover consolidant. The consolidant makes the cured surface a bit harder to sand, but it saves the hassle of taking an extra day to apply a skim coat.
Large repairs are more problematic than small ones. One complication is heat buildup: A large mass of curing epoxy can generate enough heat to start a fire, especially on a hot day. (Trust me, I’ve seen it happen.) The other problem is that a large mass of epoxy filler is very expensive.
To prevent excessive heat buildup, epoxy manufacturers suggest building up the repair in 1-inch-thick layers. A better solution — in terms of time as well as cost and safety — is to use small blocks of clean, dry wood as aggregate; I keep a bag full of blocks of various sizes in one of my kit buckets.
I begin a large repair by coating the inside of the cavity with a thick layer of epoxy paste. Next, I butter the blocks on all sides with paste and press them firmly into the hole, making sure that the paste oozes out on all sides. I try to leave 1/2 inch between each of the blocks and an equal distance between the outermost blocks and the surface. After wiping the top layer smoothly, I leave the repair to cure overnight, covered with plastic if rain or cool temperatures are expected. I clean up the putty knives and hair-dye bottles, and any other supplies I plan to reuse, by rinsing them with white vinegar.
Tooling. After it’s fully cured, the epoxy patch is as easy to shape as a joint compound. Wood chisels and a Stanley Surform plane quickly knock down the high spots. A random orbit sander and one or more detail sanders make the patch disappear.
Final protection. To ensure that the repair is fully protected from the elements, I cover the epoxy and any exposed wood surfaces with an epoxy-compatible primer, caulk every open joint, and apply two coats of a top-quality acrylic paint.
