
Wood is hygroscopic, meaning it exchanges moisture with the surrounding environment. When it absorbs moisture, wood swells, and when it releases moisture (dries), wood shrinks.
The moisture exchange between wood and the air depends on the relative humidity and the temperature of the air, and the amount of water in the wood at any given time. The degree to which wood changes dimension is dependent on the structure of the wood, which varies by species.
Carpenters have essentially five ways to manage wood movement:
Wood should be installed at moisture content levels as close as possible to the average moisture content it will experience in service. In theory, the lumber you buy has already been dried - preshrunk, if you will. Unless you're cutting your own wood and milling it into lumber, you don't need to dry lumber. But you do need to condition it on site.
Softwood lumber intended for framing is usually dried to an average moisture content of 15%, not to exceed 19%. Kiln-dried framing lumber often comes in lower at around 12%. Finish-grade softwood is dried to a lower moisture content: 10% to 12% for many appearance-grade 1-by softwoods, to as low as 7% to 9% for furniture, cabinets, and millwork. Hardwood lumber for furniture, cabinets, and millwork is usually dried to 6% to 8% moisture content.
All these percentages are the targets for moisture content of the lumber that leaves the mill. What you buy might be slightly higher or lower, depending on the climate conditions the lumber has acclimated to in the yard. In a humid climate, the wood will likely take on moisture, and in a drier climate it might dry to a lower moisture content. But what matters is the climate conditions where it will be installed. Before installing any wood building materials, you need to allow them to acclimate to equilibrium moisture content, or EMC, the moisture content when the wood is neither absorbing moisture or drying; instead, the wood is at a steady state relative to the surrounding temperature and humidity. This process of letting the wood acclimate to EMC is what we mean by conditioning.
Framing lumber can be installed at a higher moisture content than finish wood products; 12% to 14% is a good target for framing lumber in most parts of the country. Kiln-dried lumber is usually delivered at this moisture level. Thoroughly air-dried framing stock will generally have a moisture content greater than 14% when it is delivered. That's OK ... as long as the material is not carelessly handled at a yard or jobsite - no pallets dropped in the dirt or left out in the snow and rain. If lumber gets this kind of treatment, it will take up much more moisture and may not easily dry in a normal building cycle.
Barring careless handling, the normal building cycle often works to a builder's advantage: After the building is dried in (roof sheathing and windows installed), the time it takes to rough-in wiring and plumbing holds off the installation of wall and ceiling finishes. If this time is about 30 days in warm, dry weather, conventional wisdom says that wet framing lumber should lose enough moisture so that any additional drying in place will be adequate to prevent callbacks ... except that doesn't always happen. Often the schedule is pushed to much shorter cycle times. That's OK if you are using KD lumber, but it gets iffy if you are not. In cool, damp weather, or if the framing has been soaked on site, the conditioning period should be extended.

Fast construction schedules contribute to callback problems because the house framing barely has any time to dry on its own before the next stage of construction begins. Such "short cycle" houses are notorious for having lots of drywall cracks and other cosmetic defects after a year of occupancy.
The only sure way to know if you will avoid a lot of nail pops, drywall cracks, and open trim miters is to check the moisture content of door and window headers and floor and ceiling joists with a moisture meter (see "Drying Wet Framing," Jun/13). The Forest Products Lab recommends checking about 10% of the framing as good practice. So, for example, if you have 50 joists, test at least five of them in various locations to get a good sense of the average moisture content.
When the framing approaches an average of 12% moisture content, interior finish and trim can normally be installed. Dehumidifiers and HVAC equipment will increase the rate of drying. For builders especially concerned about the performance of high-end finish materials, drying the home is critical to manage not just the moisture in the framing lumber but also all the moisture in curing concrete and masonry (see "Conditioning Homes," Nov/14). Also, before wall finishes are applied, check the frame for defects that may have developed during drying, such as warped or distorted studs, shrinkage of headers, or open or loose structural joints. These should be corrected or they are likely to haunt you for the remainder of the project.
Finish lumber requires careful planning. Materials should be delivered and installed only after HVAC has been installed so indoor conditions can be controlled.

Forest Products Lab
The map above shows the recommended moisture content carpenters should be looking for in finish wood products, especially wood flooring and T&G paneling, in which the incremental change in dimension of one board adds up across a large area, creating an overall change across the entire floor, wall or ceiling.
Pay particular attention to the moisture content of wood flooring and wall or ceiling paneling. Small incremental changes in each board add up to big changes over the entire floor, wall or ceiling.

In theory, the small dimensional change across the width of one flooring board can add up to a large change across the entire floor. For this reason, it is recommended that unfinished hardwood strip flooring have a gap of 1/2 to 3/4 inch at the edges. In practice, thick hardwood flooring tends not to move a whole lot if it is nailed off adequately (every 4 to 6 inches is not too much for strip flooring), and if it is installed near equilibrium moisture content and indoor climate conditions are maintained.
Here is the procedure recommended by the Forest Products Lab for acclimating wood flooring and T&G panel products:
If you don't follow this procedure, here is the sort of scenario that is not uncommon and is always unwelcome:
Say the outdoor relative humidity in January is around 80%. In these conditions, the equilibrium moisture content for wood will be in the 15% to 16% range. If you have T&G beveled wainscot delivered at 8% moisture content and store it in the garage, it's going to take on a lot of moisture and swell until it reaches equilibrium moisture content. If you then take it right from the garage and install it with that higher moisture content, it's going to shrink when it acclimates to the conditioned indoors at say, 60% relative humidity when the equilibrium moisture content will be closer to 11%. This change will likely result in a callback, with noticeable gaps between boards.
This is a likely scenario in Portland, Ore., in January. In Portland, Maine, in January, the relative humidity outdoors might be more like 66% with the equilibrium moisture content in the 12% to 11% range. But the indoor relative humidity might be a lot drier, too: closer to 30% RH when the equilibrium moisture content for wood will be around 6%. That's enough change to lead to a similar result: gaps between boards. Even if the indoor air is a more comfortable 40-45%, the change would be enough to crack the paint between board joints. The easy fix for all these scenarios is the same: Acclimate the wood to the indoor conditions. The indoor relative humidity might vary from 30% to 50% but the equilibrium moisture content will only vary from around 6% to 9% - a range that results in an acceptable level of dimensional change for most woods.
Not all woods move to the same degree. Wood shrinks (swells) most across the width of a board and very little in length (parallel to the grain). The shrinkage across the width of the board is greatest in the direction of the annual growth rings (tangentially, when flatsawn), and about half as much across the rings (radially, when quartersawn). The amount of shrinkage also varies according to the wood structure, so species is a strong deciding factor.
The table below provides some guidelines for selecting woods for stability. There are many factors that go into wood selection, and these are just a few of the characteristics that might affect a carpenter's decision to use a particular species.

a. Dimensional change coefficients (radial and tangential) for shrinking or swelling with changes in moisture content. (Only applies to moisture changes from 6% to 14%)
b. Shrinkage in board width (expressed as a % of the green dimension) as the board is dried from green to oven-dry moisture content.
c. The density of wood varies by moisture content. This shows the specific gravity when wood is green.
d. Decay resistance may be less for members placed in contact with the ground and/or used in warm, humid climates. Use caution when using naturally durable woods in structurally critical or ground-contact applications.
e. Old-growth Teak is known to be Very Resistant; old-growth redwood is Resistant; old-growth eastern white pine and southern yellow pine are Moderately Resistant; only the dark red species of Marenti is Moderately Resistant
The species have been ordered from small to large Dimensional Change Coefficients for flatsawn boards, which are more commonly available than quartersawn material. (For a complete list of coefficients for other species of wood, see the table in chapter 13 of the Wood Handbook.)
In general, flatsawn (or "slash-grain") boards tend to be less stable than quartersawn lumber. Specifically, quartersawn (or "vertical-grain") lumber shrinks and swells less in width (while flatsawn boards shrink and swell less in depth). Quartersawn wood also tends to be naturally more resistant to water penetrating or passing through it, and it tends to hold paint better than flatsawn lumber.
Dimensional Change Coefficients allow for a quick estimation of how a board of a particular width will move with expected changes in moisture content using the formula:
Width of board x MC change x Dimensional Change Coefficient
For MC change, three is a good default. (This reflects a change from 9% to 6% , or from 11% to 8%, as examples. It's a good estimate of the fluctuation of wood content in most conditioned homes over the course of a year, assuming they are both heated and air-conditioned with well-sized equipment. If you measure the moisture content of the wood products in a home over a year, you can get a more precise measure of the expected change in width.)
The formula is only approximate, but it can be used for comparing species. For example, let's examine how 5-inch-wide T&G ceiling paneling in ash and in hickory might perform in service.
Ash: 5" x 3 x 0.00274 = 0.0411" (just under 3/64" per board)
Hickory: 5" x 3 x 0.00411 = 0.0611" (just under 1/16" per board)
Given that we are using a change of 3% in MC, typical for wood in most conditioned homes, hickory would not be an especially good choice for wide boards in an application where each board is butted. For narrower window casing or strip flooring, however, hickory can be a good choice, but you would want to be careful to condition it well (and be precise about it by measuring the moisture content), and to not skimp on fasteners, particularly for flooring.
The formula works only within a moisture content range of 6% to 14%, so it can't be used in all the scenarios of conditioning wood discussed above. In the Portland, Ore., scenario, we had a change from 16% MC to 8%. But you could solve for a change from 14% to 8% MC (or as in the scenario from Portland, Maine, where the change was from 12% to 6% MC): With a MC change of 6 percentage points, each ash board would shrink 0.0822" (more than 1/16"), and each hickory board, 0.1233" (almost 1/8"). It's clear that without conditioning the wood to the interior environment, both scenarios lead to unsatisfactory results.
Bottom line: Without conditioning the lumber, you can't solve problems by choosing a more stable wood. With conditioned wood, you can get an approximate idea of how much a particular species will move in service; that can help you decide if you need to be extra careful about the application or the way boards are joined.
How you decide to join pieces of wood can sometimes help to resist movement. But most of the time, smart wood joinery simple hides the movement.
Butt joints are perhaps the simplest way to join two pieces of wood, but for exterior trim, simple is often the best. Alignment is less of an issue with exterior trim; the important thing is to avoid joints opening up and allowing water to penetrate.

Corner boards shimmed out to overlap the ends of siding will last longer than a vertical caulk joint between the siding and the trim.
For example, with corner boards, fasten the butt joint well (ring-shank nails recommended), and then just place occasional nails in the middle of each face. The goal is to keep the corner closed and allow the swelling and shrinking to show up at the edges near the siding. It's best if you can pack out the corner boards, as shown at left, rather than relying on a caulk joint between the siding and trim. Caulk will fail much sooner than the trim or siding and need regular maintenance.
Beware especially wide boards for exterior use, as these will experience the most dimensional change. Fasten in the middle only and design the joints at the edges to move.

The builder of these decks stairs embraced the fact that the wood would move.
With exterior butt joints, it often works to leave them intentionally long rather than aiming for alignment at corners. The deck stair at right offers a good example. With the treads and risers running past the finish stringer, dimensional change in the wood will be less noticeable.
Reveals. Most interior and exterior woodwork is, by convention, designed to accommodate some wood shrinkage. The reveals typical between casings and jambs are a prime example. The standard 1/8- to 1/4-inch offset creates a layered effect that is visually appealing in part because we have grown accustomed to these stepped layers. But they serve another purpose: They hide the dimensional changes that are inevitable as boards expand and contract in width. If you were trying to align casings and jambs with a simple butt joint, even 1/32-inch of expansion or contraction across the width of the casings would be a discernible misalignment.
Miters are an attractive way to join wood, but in most exterior applications, they stay tight only when the air temperature and humidity match the day they were installed. When the weather changes, miters tend to open up and allow water to get in and cause rot. Indoors, if you are using unstable woods (those with a high dimensional change coefficient, as shown in the Table above), or using especially wide boards, miters may not be the best choice.
As mentioned previously, when moisture content changes, wood expands or shrinks across the width of the board. This causes the miter to open at the toe (the long points of the cut) or the heel (the short points of the cut). Which part of the miter will open is directly related to the moisture content of the boards when they are installed (see illustration, below). A dry board will expand as it takes on moisture, causing the long points to open up. A wet board will dry out, causing the heel to open up.

The dotted lines on the illustrations show the original board sizes. As a dry board takes on moisture and swells, the long points of the miter joint will open up (top); as a wet board dries and shrinks, the heel will open (bottom).
Exterior conditions that constantly force wood to its minimum and maximum dimensions are especially rough on miters. You can try to control these natural forces using biscuits, screws, or glue. They will work for a time, but chances are they’ll eventually fail. Glues break, material splits, fasteners work loose. The biggest problem is when the two boards twist in opposite directions. This will make even a good miter look bad, with one tip of the miter lifting up and the other drooping down. As the boards deteriorate from weather and water works its way in, the joint will eventually fail.
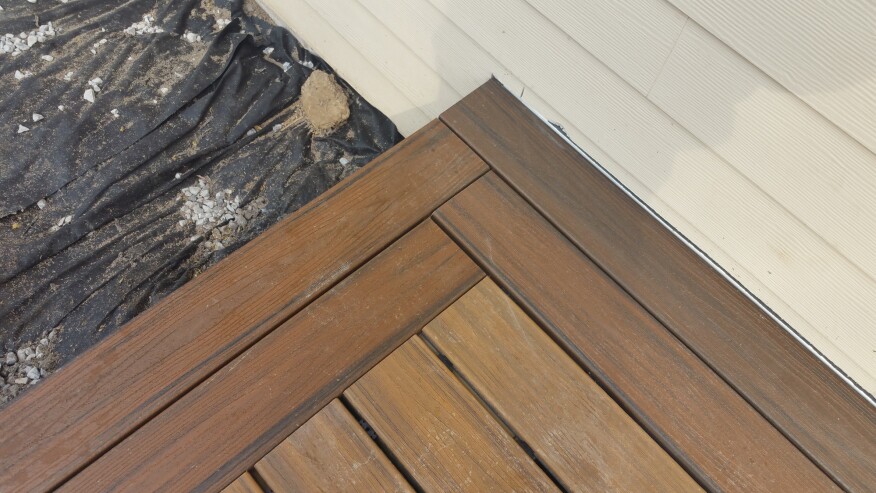
Knowing that miters on exterior deck boards will open, James Baldwin of Morgantown, W.Va. avoids them altogether by weaving the boards together at corners.
Deck boards are particularly vulnerable to dimensional changes because of the extreme conditions - maximum UV light and rainwater that lays on the boards and soaks in. Becasue miters in deck boards are usually difficult to keep tight, some builders steer clear of miters altogether, opting for an "anti-miter" approach, as shown in the photo above (see "No-Miter Method for Trimming Corners").

Lavrans Mathiesen of Portland, Ore. embraces the movement of miters and purposefully gaps them. Any widening ont he gap is unlikely to be noticed. He rounds the edges to create a pleasing "pillowed" effect.
Another approach is to intentionally gap the miter with the same-width gap that is used between deck boards. Deck builder Lavrans Mathiesen, of Portland, Ore., further "pillows" the edges of each miter-cut board, rounding over the corners to give the joint a kind of Greene-and-Greene look. It's a full embrace of the fact that the joint is going to move; the gap conceals the change.
